

Как проверить, пуста ли папка в PowerShell?
Пустые папки могут загромождать вашу файловую систему и затруднить поиск нужных данных! PowerShell предлагает несколько методов проверки того, пуста ли папка, давайте рассмотрим некоторые из них!
Вариант 1. Использование командлета Get-ChildItem для проверки того, пуста ли папка
Самый простой способ проверить, пуста ли папка с помощью PowerShell, — использовать командлет Get-ChildItem. Этот командлет выводит список файлов и папок в указанном каталоге. Если в каталоге нет файлов или папок, это означает, что папка пуста. Вот простой способ проверить, пуста ли папка:
В этом скрипте:
- извлекает все элементы по указанному пути к папке. Параметр используется для включения в поиск скрытых файлов и папок, поскольку командлет GCI по умолчанию не отображает скрытые файлы.
- вычисляет количество элементов, возвращаемых .
- проверяет, равно ли количество элементов 0 (что означает, что папка пуста).
- Оператор выводит, пуста ли папка или нет. Get-ChildItem возвращает значение Null (или пустую строку), если в нем нет файлов и подпапок.
Замените параметром пути к папке, которую вы хотите проверить.
Другой способ проверить, пуста ли папка, — использовать командлет Test-Path PowerShell. Этот командлет проверяет, существует ли файл или папка в указанном каталоге. Если папка существует, но в ней нет файлов и папок, это означает, что папка пуста. Вот команда PowerShell, позволяющая сделать это:
Эта команда проверит наличие каких-либо файлов или папок в каталоге «C:\Temp\Logs\Docs», используя подстановочный знак (*). Если папка пуста, команда вернет «False»; в противном случае это будет «Истина». Мы можем обернуть скрипт внутри функции, чтобы сделать его пригодным для повторного использования:
Как проверить, нет ли в папке файлов (но есть папки)? Используйте переключатель -PathType в командлете PowerShell Test-Path. Например, «Test-Path -Path C:\Folder\* -PathType Leaf».
Вариант 3: Использование GetFileSystemInfos()
Третий способ проверить, пуста ли папка, — использовать метод GetFileSystemInfos(). Этот метод представляет собой метод .NET Framework, который можно вызвать для объекта папки (здесь мы используем командлет Get-Item для получения папки) и возвращает массив объектов FileSystemInfo, которые представляют файлы и подпапки в папке. Затем вы можете проверить длину массива, чтобы увидеть, есть ли в папке какие-либо элементы.
Чтобы использовать GetFileSystemInfos(), откройте PowerShell с правами администратора и выполните следующую команду:
Этот сценарий проверяет папку «C:\temp» и ее подпапки и возвращает «Папка пуста», если она не содержит файлов или подпапок. Если папка не пуста, возвращается «Папка не пуста».
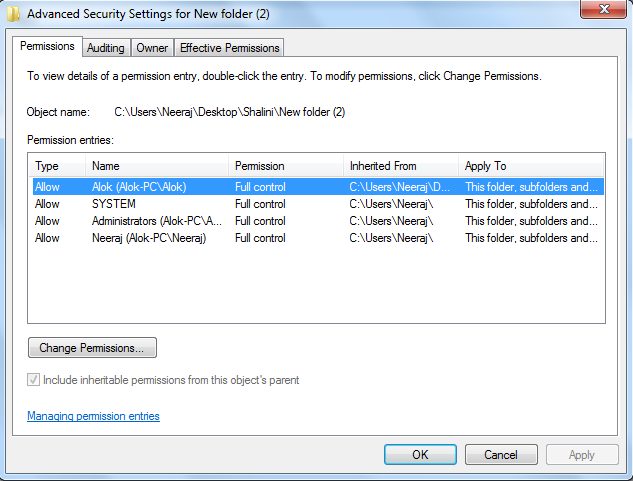
5. Modify the Affected Folder’s Permissions
Error 0x80070091 can arise because of insufficient folder permission. You might need to set an affected folder to full permission to resolve error 0x80070091. To do that, change the folder’s permission settings as follows:
- Open Explorer and right-click the affected folder to select Properties.
- Click the window’s Security tab.
- Next, press the Advanced button.
- Click Change beside the owner’s name.
- Enter your Windows user account name inside the object name text box.
- Then select the Check Names option and OK.
- Click Replace owner on subcontainers and objects to select that setting.
- Press the Advanced Security Settings window’s Apply and OK buttons.
Переместить файлы из папки «This folder is not empty java» в другую директорию
- Откройте проводник на вашем компьютере и найдите папку «This folder is not empty java».
- Откройте второе окно проводника и найдите папку, в которую вы хотите переместить файлы.
- В первом окне проводника выделите все файлы и папки, которые находятся в папке «This folder is not empty java».
- Кликните правой кнопкой мыши на любом выделенном элементе и выберите опцию «Вырезать».
- Перейдите во второе окно проводника, где находится целевая папка, и кликните правой кнопкой мыши внутри этой папки.
- Выберите опцию «Вставить», чтобы переместить выделенные файлы и папки из папки «This folder is not empty java» в выбранную директорию.
После выполнения этих шагов файлы и папки из папки «This folder is not empty java» будут перемещены в другую директорию. Пожалуйста, убедитесь, что вы выбрали правильную директорию назначения, чтобы избежать потери данных. Избегайте перемещать или изменять файлы, находящиеся в папке «This folder is not empty java», пока процесс переноса не будет завершен.
Run System Restore from Safe Mode
Safe Mode is a Windows feature that uses a simple interface and only executes the apps that are required. This way, you can be sure that no other programs like antiviruses are interfering with your System Restore.
- Press Windows > Power option.
- Press and hold the Shift key and hit Restart.
- Click Troubleshoot > Advanced Options > Startup Options > Restart.
- Your system will now restart and provide you with a number of options to choose from.
- To enter Safe Mode, press F4 on your keyboard.
Your computer will reboot to Safe Mode, which means that only the programs that are absolutely necessary will be operating, ensuring that there are no disruptions. Now conduct a System Restore by following the steps below.
- Hold the Windows key, then press the R key.
- Type in rstrui.exe and hit Enter.
- Click Next and select the restore point that you want to revert to.
- Click Next > Finish.
Now, wait for the system restore to finish.
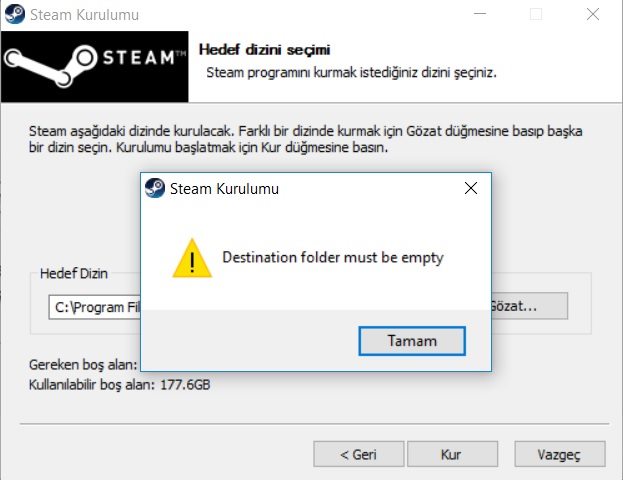
Причина и решение проблемы
Как мы уже выяснили, при установке Steam пытается создать папку для своих файлов, но находит в директории такую же и с тем же наименованием и прерывает процесс, информируя нас, что «destination folder of the directory must be empty». Теперь попробуем решить эту проблему, для чего предлагаем вам три простых способа.
Удаление папки
- Откройте «Пуск» — «Компьютер» — «Диск С», если у вас Windows 7 или «Проводник» — «Этот компьютер» — «Диск С», если у вас 10-я версия «Виндовс».
- Найдите папку Program Files (x86), а в ней будет вложена Steam.
- Удалите папку со Steam полностью.
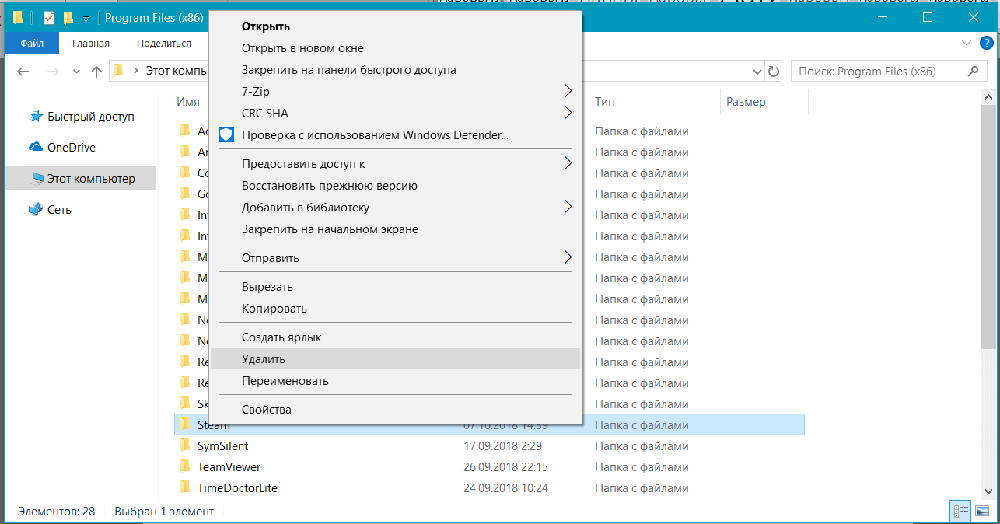
Часто бывает, что система сопротивляется деинсталляции папки, указывая, будто эти файлы задействованы в каких-то процессах. В таком случае попробуйте следующее:
- Перезагрузите ПК и повторите операцию.
- Вызовите Task manager (Ctrl+Alt+Del), найдите в процессах Steam и завершите их все (выделить названия + кнопка внизу справа «Завершить»), а потом попытайтесь удалить папку опять.
- Нажмите на папку правой кнопкой мыши и выберите «Свойства», а в них – вкладки «Безопасность» и «Дополнительно». Выберите профиль пользователя, под которым вы сейчас работаете на ПК и поставьте отметки напротив «Разрешить удаление».
- Если все это ни к чему не привело, скачайте утилиту для принудительной деинсталляции папок (например, Unlocker), откройте ее, выберите директорию Steam. Откроется список процессов, которые нужно убрать с помощью специальной кнопки, а после можно спокойно удалить папку.
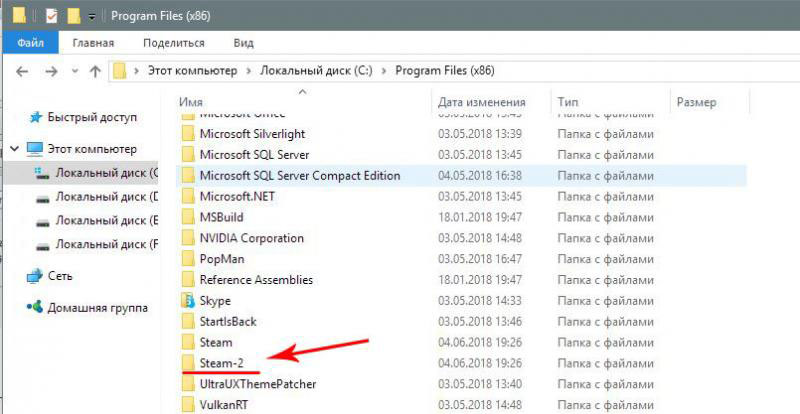
Переименование папки
- Начните установку Steam заново, минуя шаги принятия пользовательского соглашения и выбора языка.
- Когда вас попросят указать директорию для хранения файлов, выберите «Обзор».
- Пройдите по пути: C:\Program Files (x86)\Steam. Откройте папку Steam и создайте в ней новую с другим названием (например, Steam 2 – используйте латиницу).
- Подтвердите, что вы хотите хранить элементы Steam здесь.
- Продолжайте установку – сообщение об ошибке должно исчезнуть.
Указать другую директорию
Этот способ похож на предыдущий, но последовательность действий немножко другая:
- Откройте диск D и создайте там папку Steam 2 или с другой припиской.
- Начните процесс инсталляции и вместо директории по умолчанию нажмите «Обзор».
- Выберите свою папку на диске D.
- Дождитесь завершения инсталляции и, не запуская программу, перенесите созданную вами папку в директорию по умолчанию, т.е., в папку Steam на диске С.
Также прочтите несколько советов, которые помогут вам избежать проблем со Steam в дальнейшем:
- Не переименовывайте корневую папку в процессе работы с программой – все ваши игры и сохранения будут аннулированы, словно вы их удалили. Например, если вы припишите к названию Steam еще что-то (Steam game, Steam.org и т.п.), пропадет доступ к созданным библиотекам, и придется все переустанавливать заново.
- Если вы удалили Steam с целью установить его снова, то после деинсталляции обязательно просканируйте ПК программой очистки, например, CCleaner, чтобы избавиться от всех старых файлов полностью.
- После удаления Steam стандартным способом зайдите в директорию и проверьте, удалилась ли папка с файлами приложения. Если нет, уберите ее сами, чтоб не забыть и не столкнуться при повторной установке с ошибкой «Destination folder must be empty».
Как я могу исправить Эта папка пуста ошибка в виндовс 10?
1. Используйте инструмент Copernic Desktop Search

Copernic Desktop Search — бесплатный инструмент для поиска утерянных файлов различных типов расширений на собственном ПК, а также текстовых, графических, музыкальных и видеофайлов.
С этим замечательным инструментом вам не нужно выполнять поиск по всему жесткому диску. Вы можете легко настроить конкретный USB-накопитель, который вы хотите найти, и т.Результаты поиска, которые вы получаете, являются точными и исчерпывающими.
Результаты поиска представлены в порядке дат, и предлагаются полезные параметры поиска. Вы можете установить его сейчас и получить обратно свои соответствующие данные. Этот поисковик на рабочем столе распознает более 150 типов файлов.
Вы также можете использовать его, чтобы найти потерянные электронные письма, документы и контакты или вернуть почти все, что вы внезапно потеряли.

Звездный Data Recovery поможет вам восстановить файлы, которые кажутся потерянными или не могут быть открыты или использованы.
Нужна дополнительная информация о том, как на самом деле работает этот инструмент восстановления? Просто найдите время, чтобы проверить это подробный обзор Stellar Data Recovery.
Короче говоря, после запуска программы привлекательный интерфейс показывает все диски, доступные на компьютере.
Также можно читать и восстанавливать файлы с удаленных разделов, USB-накопителей, смарт-карт или поцарапанных CD/DVD.
После того, как вы выбрали носитель, вам нужно выбрать местоположение, а затем нажать на кнопку Сканировать кнопку в правом нижнем углу, чтобы начать поиск потерянных файлов.
Если искомый файл отсутствует среди найденных элементов, вы все равно можете выполнить глубокое сканирование.
3. Вставьте флешку в альтернативный USB-разъем

- Вставлять в флеш накопитель в другой разъем USB.
- Проводник может не отображать Содержимое USB-накопителя.
- Если это так, возможно, что-то не так с одним из USB-портов.
4. Используйте средство устранения неполадок оборудования и устройств.
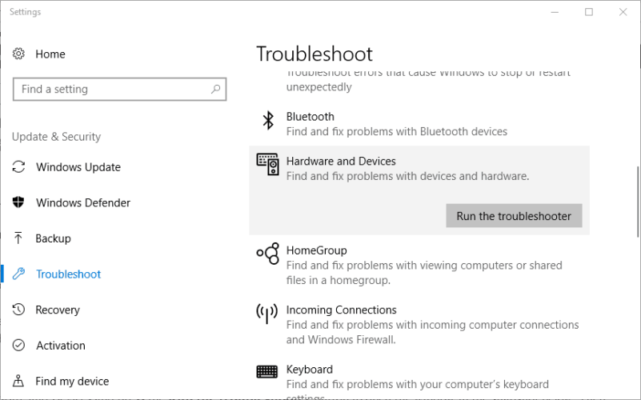
- Затыкать флэш-память USB в настольный компьютер или ноутбук.
- Далее нажмите кнопку Введите сюда для поиска Кнопка Cortana на панели задач.
- Введите ключевое слово устранение неполадок в поле поиска.
- Выбирать Устранение неполадок.
- Выбирать Оборудование и устройства.
- нажмите Запустите средство устранения неполадок кнопка.
- Следуйте инструкциям на экране, чтобы починить USB-накопитель.
5. Выберите параметр Показать скрытые файлы, папки и диски.
- Открой Кортана окно поиска приложения.
- Входить папка в поле поиска.
- Выберите, чтобы открыть Показать скрытые файлы и папки.
- Выберите Показать скрытые файлы, папки и диски вариант.
- Затем отмените выбор Скрыть защищенные системные файлы вариант.
- Нажмите на Применять и ХОРОШО кнопки.
Содержимое флешки может быть не видно, если Показать скрытые файлы, папки и диски опция не выбрана. Выбор этого параметра гарантирует отсутствие невидимых папок и файлов.
6. Показать невидимые файлы с помощью команды attrib
- Нажимать Клавиша Win + клавиша X и выберите Командная строка (администратор).
- Тип атрибут -h -r -s /s /dg:*.* в командной строке и нажмите Входить.
Возникли проблемы с доступом к командной строке от имени администратора? Посмотрите внимательно на это руководство!
Выполните каждый из этих шагов и сообщите нам, какой из них лучше всего подходит для вас, оставив комментарий в разделе ниже.
Solution 3: Restart Windows Explorer
Introduced in Windows 95 and later versions, Windows explorer is the file manager which allows users to manage files, folders and network connections, as well as search for files and related components.
In order to fix the situation that you can’t delete a folder in Windows 10, please restart your Windows Explorer.
How to restart your Windows Explorer? Here is the tutorial.
Step 1: Right-click the taskbar on the desktop and select the Task Manager option.
Step 2: After getting the Task Manager window, find Windows Explorer among the options in the Processes tab. Right-click it and then choose the Restart option or select Windows Explorer and then click the Restart button at the bottom right corner of the Task Manager window.
Step 3: Try to delete the folder to check the issue has been solved. If you still receive this error message that the directory is not empty, please move to the following solutions.
Why is My Documents Folder Empty on my Mac?
Here are the major reasons that will explain why your documents and folders disappearing from the Mac Document folder:
- Files in the Document Folder Are Deleted
The main reason is that you carelessly or unintentionally emptied the Document folder or deleted all the files in the folder.
- iCloud Is Enabled to Sync Files from Mac
A new feature in macOS allows you to sync files from your desktop and Documents folder to iCloud so as to allow you to access these files on all your devices.
However, if you disable this feature while syncing files, it will delete them from your computer. Relax, those files still exist. They were simply removed from the desktop and Documents folder and left in iCloud Drive.
- Mac Finder Hides Files in Document Folder on Mac
By changing the preference settings, Mac Finder may hide your files from being visible in the Document folder.
FMS Empty Folder Remover
Более простая с виду утилита, чем Remove Empty Directories. Выводит в указанном расположении не только пустые папки, но и папки, которые сами содержат пустые каталоги.


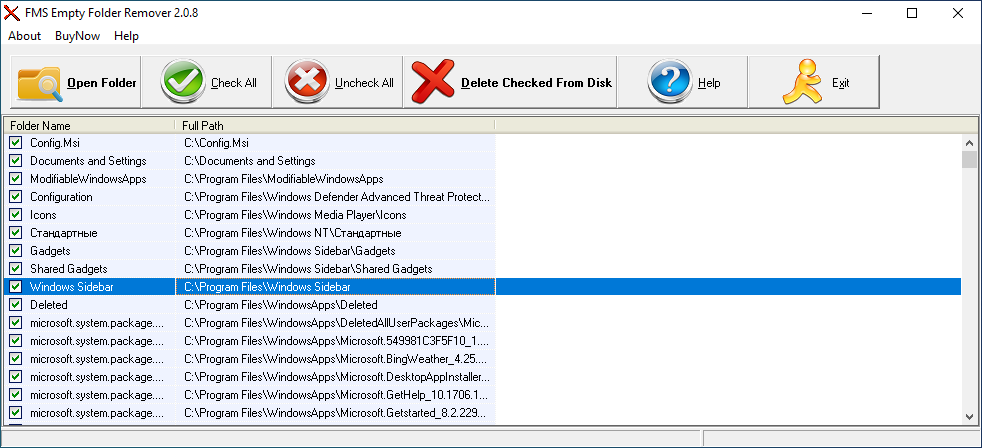
Выводит всё единым списком, кликом по выбранной папке позволяет открывать ее содержимое, работает молча, удаляя только те объекты, владельцем которых не является Система или другие важные системные службы.
Так удалять или нет
Объяснив, как находить пустые папки, мы так и не ответили на вопрос «можно ли их удалять». Можно, если вы знаете, что делаете. Например, вы деинсталлировали программу и удалили ее оставшиеся папки в Programs Files, ProgramData, %userprofile%\AppData\Local и пользовательских библиотеках.
Тестирование приведенных выше программ с удаление пустых папок на диске С (из 2240 осталось только 228 папок) не привело к видимым негативным последствиям, так как система попросту не позволила удалить защищенные каталоги. И это правильно, ведь если Windows их создала и защитила, то сделала это неспроста. Удаление этих папок вряд ли привело бы к критическому сбою, но могло бы вызвать разного рода неполадки, если только система не создала бы их автоматически при следующей загрузке и входе в учетную запись пользователя.
Ссылки на утилиты: yadi.sk/d/mwLUAd0vtaijJA
Remove Empty Directories: www.jonasjohn.de/red.htm
Empty Folder Nuker: www.softpedia.com/get/System/File-Management/Empty-Folder-Nuker.shtml
FMS Empty Folder Remover: www.filemanagersoft.com/emptyfolderremover.html
All 9 Replies
http-equiv=»Content-Type» content=»text/html;charset=UTF-8″>id=»js-replies» class=»dw-replies position-relative pt-1″>
The Windows.old folder is normal. There are a lot of articles about it on the web so I will avoid duplicating the web here. After some time, Microsoft will clean it off for you. You can ignore it if you wish or you can do more research.
1
Despite having all the files and folders, your Windows PC warns you that the selected drive is empty. The error occurs due to several reasons such as virus or malware infection, damaged device drivers, hardware issue, file system corruption, and a few other common issues.
Maybe there are lots of files in the folder but your user account doesn’t own them / have permission to read them, so it’s showing up as 0?
Something else I’ve noticed is that I don’t believe the file count is recursive. Meaning if there are files within sub folders, they aren’t counted. So the file count is just how many files are immediate children of the folder you’re investigating.
I appreciate all the replies though I guess I’ll never know for sure. And keep in mind, this has happened several times before and on different machines which would probably rule out virus, damaged drivers, etc.
After I do a reinstall and after I cut and paste all my personal files from Windows.old to the new installation, Windows.old is ’empty’. There is nothing to be seen in the folder.
Yet, when I attempt to delete this ’empty’ folder is when I see hundreds of files being deleted. If it were a matter of permissions, I doubt I would have been able to cut files from the folder.
There is really no problem here as I am able to retrieve all the files I need before deleting the folder. I was just curious as to what all the files shown in the progression bar during deletion were. I have never missed anything important after deleting the Windows.old folder with all its mysterious files, which makes sense as files stored in Windows .old would not be used by the new system anyway.
Thanks
2
The proper way to get rid of windows.old is to use the Windows Disk Cleanup utility. You have to select .
3
Open My Computer.
Click on the Search Tab to open the Search Menu.
From the Search Menu set the Size filter to Empty and be certain that the All subfolder feature is checked.
After the search ends, it will display all archives and folders that do now not take up any reminiscence space.
1
There’s an amusing old story about how all those files got there…
1
Be a part of the DaniWeb community
We’re a friendly, industry-focused community of developers, IT pros, digital marketers,
and technology enthusiasts meeting, networking, learning, and sharing knowledge.
5 Ways to fix Error 0x8007009
Usually, this error “The directory is not empty” can be fixed by renaming the folder. But if that does not help, you can try some methods to fix this, follow these method:
Method 1: Virus Scan
Scanning and fixing virus or malware on your computer is usually an effective solution. If you are facing this error, run a full scan of your computer with the installed anti-virus and try performing the task again.
Windows 10 users can also open ‘Command Prompt’ from the search bar near the Start menu and perform a specific check for the particular drive where you are getting the error by typing the following text, where E is the name of the drive where you are getting the error and hit ‘Enter’
chkdsk /f /r E:
Method 2: Removing Junk Files
Too many junk files on your computer can be other reason you might be getting error 0x80070091. To clean them, press Win keys to open the menu.

![[fixed] error the directory is not empty windows issue (100% working)](https://yarmarka-gazeta.ru/wp-content/uploads/2/b/a/2ba1342a972358a68f6100ad5ed8bba5.png)

![[solved] windows 10 error: "this folder is empty"](https://yarmarka-gazeta.ru/wp-content/uploads/a/b/8/ab8e55566b80320c1cfc932208c33b66.png)
![4 best ways to fix sd card says “folder is empty” error [2023]](https://yarmarka-gazeta.ru/wp-content/uploads/d/2/7/d27a1ce3aac90e0a878db71926bdfc59.png)


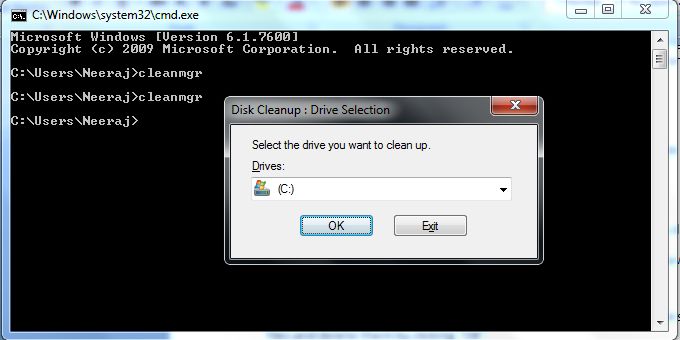
Go to ‘Command Prompt (Admin)’ and run it as an administrator by clicking ‘Yes’.
Type the following text and hit ‘Enter’.
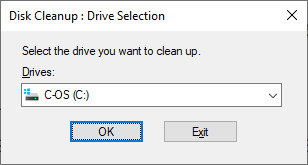
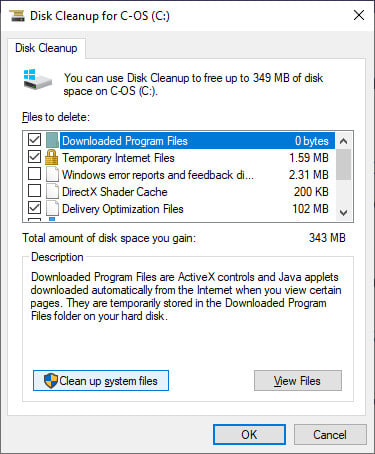
cleanmgr
Select the drive on which you want to run a scan.
This will give you details of all the files on the selected drive. You can select temporary and unimportant files and delete them by clicking ‘OK’.
Try deleting the specific folder again after removing the junk.
Method 3: Access the computer as Administrator
This error can also occur if you are not logged in to your computer as Administrator. To check and make changes to the directory, open ‘Windows Explorer’ and open the parent directory of the folder you are trying to delete.
Right click the folder and go to ‘Properties’.
In ‘Properties’ window, go to ‘Security’ tab, select ‘Advanced’ and then go to ‘Owner’ as shown below:
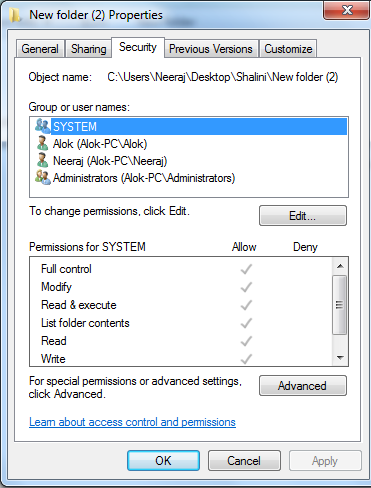
‘Advanced Security Settings for Error‘ tab will open
Change the ownership of the file to ‘New Owner’ and select ‘Replace Owner’ for the file.
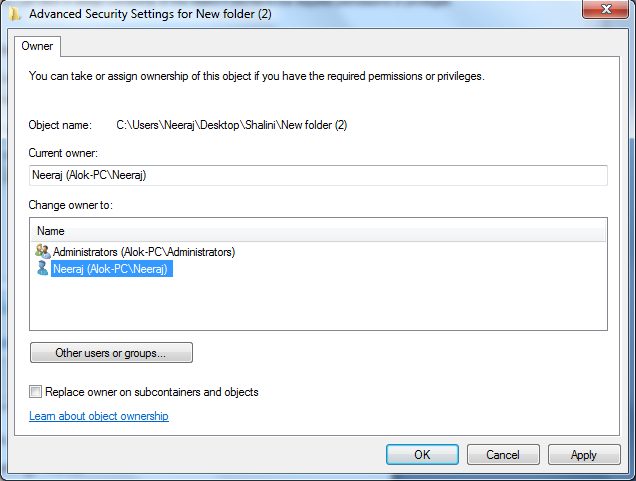
Close the window after saving your changes by hitting ‘OK’ and try deleting the file again.
Now you have full access to the folder.
Make sure to keep your system secure – free anti ransomware tool.
Method 4: System Restore
If the error is occurring even after taking the basic steps, a System Restore might be effective in fixing it.
Go to search bar and write system restore.
Select ‘System Restore’ from the window that opens and choose a date for restoring before you started facing the error.
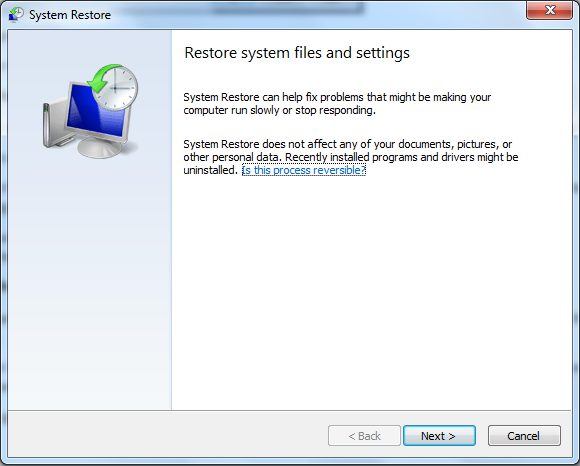
This will shut down and restart your computer after which either the file should be automatically deleted or you can delete it without facing the previous error.
Method 5: Restart Windows Explorer
Restarting Windows Explorer can be a really effective way to deal with errors of unknown origin like this one.
Open ‘Task Manger’ on your computer and go to ‘Processes’ tab.
Scroll down to find ‘Windows Explorer’ and select it with a click.
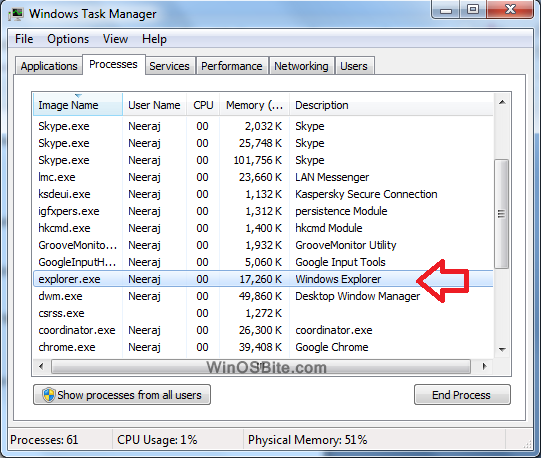
Now go to the bottom right corner of the window and click on the ‘End Process’ button.
Solution 2: Check and Fix Bad Sectors
Bad sectors on the hard drive also lead to this error message. Therefore, you need to check the bad sectors and fix them.
Check Bad Sectors for Hard Drive
How to make sure there are any bad sectors on your hard drive? Here we recommend the free third-party software named MiniTool Partition Wizard to check the bad sectors on your hard drive.
This software is a multifunctional toolkit to help you manage your hard drive easily and effectively, like creating partitions, migrating operating system, converting MBR to GPT, and so on.
Here is the tutorial on checking the bad sectors on hard drive with MiniTool Partition Wizard.
Step 1: Download MiniTool Partition Wizard and launch it to get its main interface.
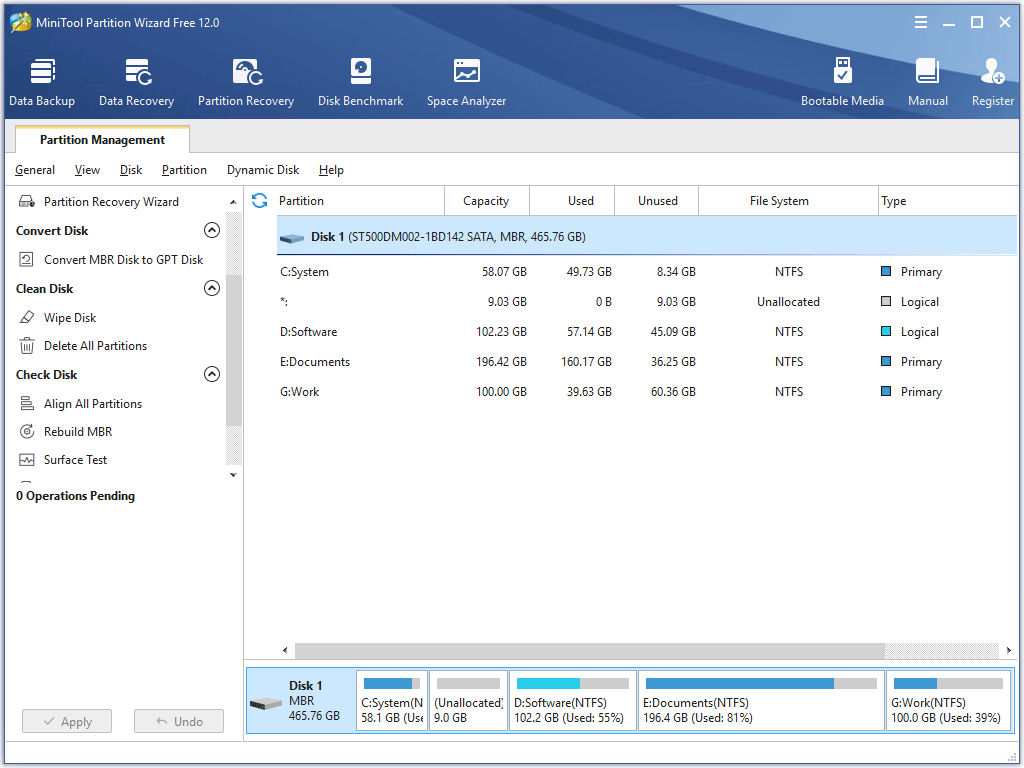
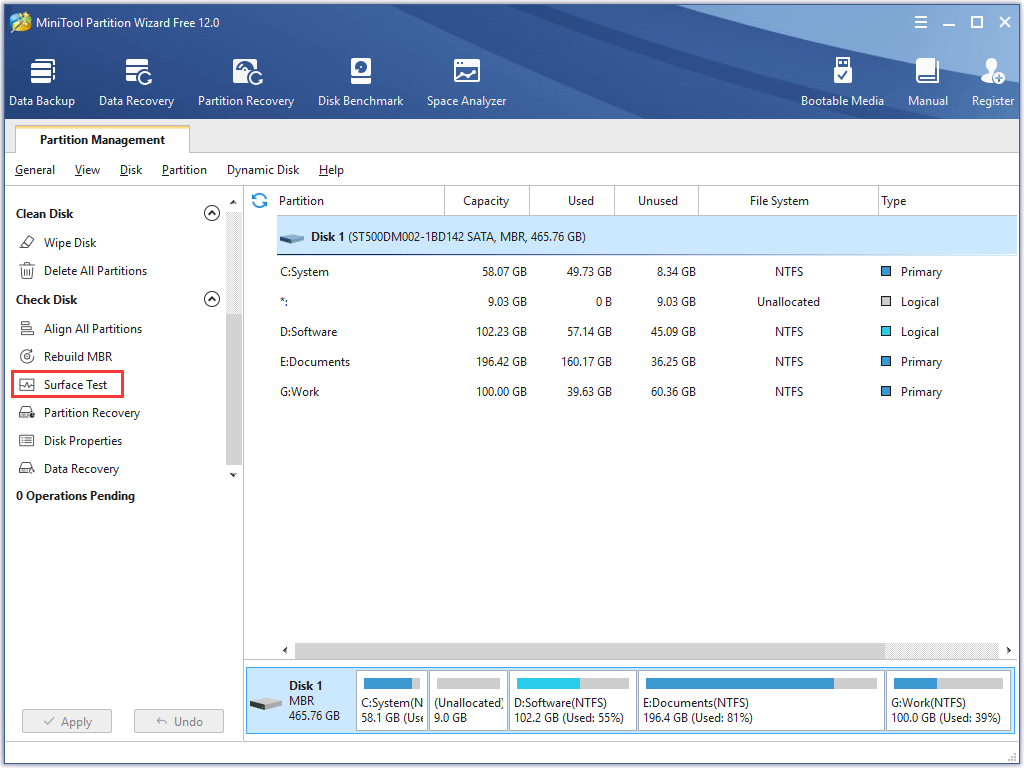
Step 2: Select one hard disk in the Disk Map and choose the Surface Test feature from the left panel.
Note: The Surface Test feature is used to scan each sector status by reading data from the sector. After scanning, disk block without reading error will be marked with green, while the disk block with reading error marked with red. Therefore, in the scan result, you can see at a glance whether there are bad sectors.
Step 3: After getting the Surface Test window, please click the Start Now button to check the bad sectors on the hard drive.
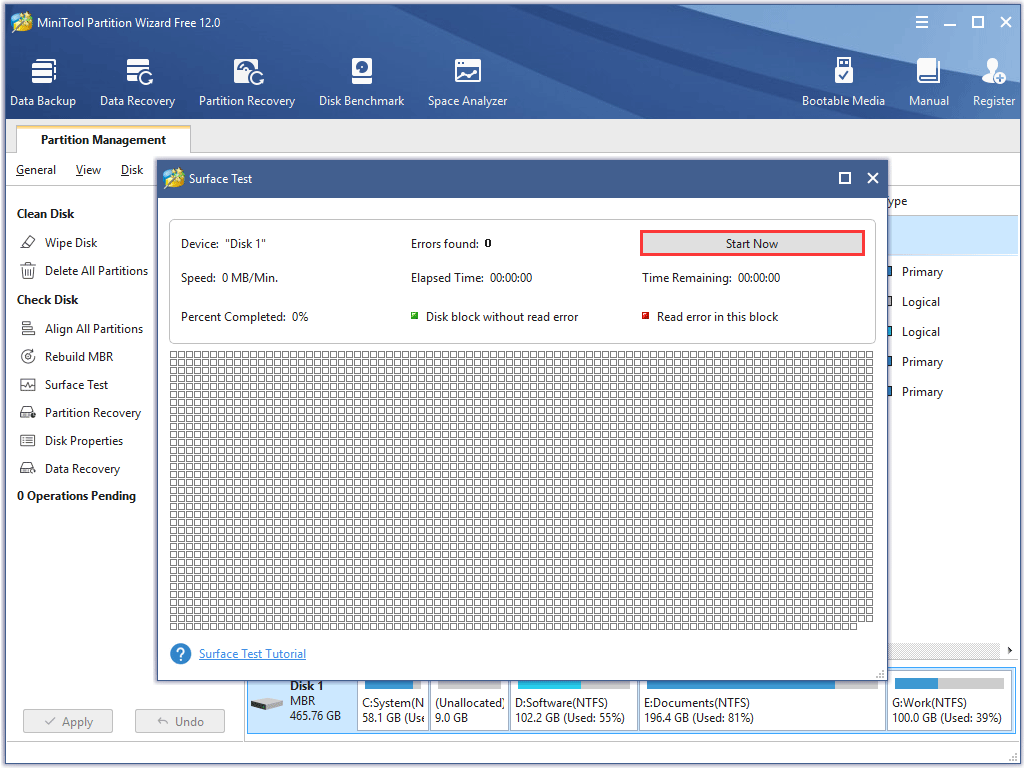
Step 4: Wait for the feature to complete the testing.
Step 5: Check the test result. There are two cases:
Case 1: If there are some red squares in the test result, it means that there are some bad sectors on your hard drive and you need to repair them by Command Prompt.
Note: In case of data loss caused by bad sectors on your hard drive, please back up data regularly.
Case 2: If there is no red square, it means the bad sectors are not the cause of this issue, and you can directly seek help for the following solutions.
Fix Bad Sectors for Your Hard Drive
To fix the bad sectors, you are required to run Command Prompt.
Several steps to fix bad sectors via Command Prompt:
Step 1: Run Command Prompt as administer.
- Type Command Promptin the Cortana’s search
- Right-click the first searchingresult and select Run as administrator.

Step 2: After the Command Prompt window pops up, please type the chkdsk /f /r #: command and then hit the Enter key on the keyboard.
- Switch /f is to fix the detected problems;
- Switch /r is to identify the bad sector and recovers information for such sectors;
- # refers to the drive letter of partition.
Note: After entering this command, your PC will restart and perform the tack. Please do not shut down the machine forcefully.
Step 3: Type Y and hit the Enter key on the keyboard if you are asked to check your disk the next time your PC restarts.
After finishing the whole process, you can try to delete folders or perform other operations to them.
Solutions to Solve This Folder Is Empty Issue and Recover Missing Files
You have three options in all to solve a folder that shows empty but files are sure to be there on Windows 10, 8, and 7. The methods are showing hidden files from Windows Explorer, using command prompt line and third-party EaseUS Data Recovery Wizard software.
1. Recover Hidden Files in an Empty Folder With Data Recovery Software
The most effective way to show hidden and recover lost/missing files are using third-party data recovery software. Here, we highly recommend you try EaseUSEaseUS Data Recovery Wizard to retrieve all kinds of files that were deleted, hidden, or disappeared for no reason. It requires no computer skills, and the recovery procedure is effortless. Follow the three steps below and find your lost files.
Download for Win Recovery Rate 99.7%
Download for Mac Trustpilot Rating 4.7
Step 1. Select the virus infected drive to scan
Run EaseUS virus file recovery software on your Windows PC. Select the disk attacked by the virus to scan for lost or hidden files. Note that:
- If it’s an HDD where files were hidden or deleted by virus, it’s better to install the software on a different volume or an external USB drive to avoid data overwriting.
- If the infected device is an external hard drive, flash drive or memory card, it doesn’t matter to install the software on the local drive of the computer.
Step 2. Check all scanned results
Step 3. Preview and recover deleted/hidden files
When the process finishes, you can preview the scanned files. Select the files you want and click the «Recover» button. You should save restored files to another secure location on your computer or storage device, not where they were lost.
2. Show Hidden/Lost Files in an Empty Folder in File Explorer
Microsoft gives a detailed guide to help on how to display hidden files in all its Windows versions 10/8.1/8/7. Despite a small difference in performing this action for each version, the basic operation is the same. That is finding the unhiding option inside the File Explorer. In Windows 10, you can unhide all files with these two steps.


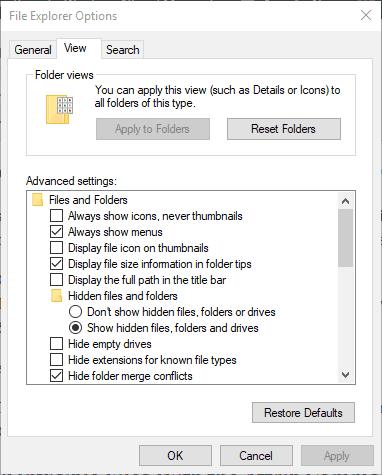
Step 1. In the search box on the taskbar, type folder option, click «View».
Step 2. Select «Show hidden files, folders, and drives» beneath «Hide files and folder». And then select «OK».
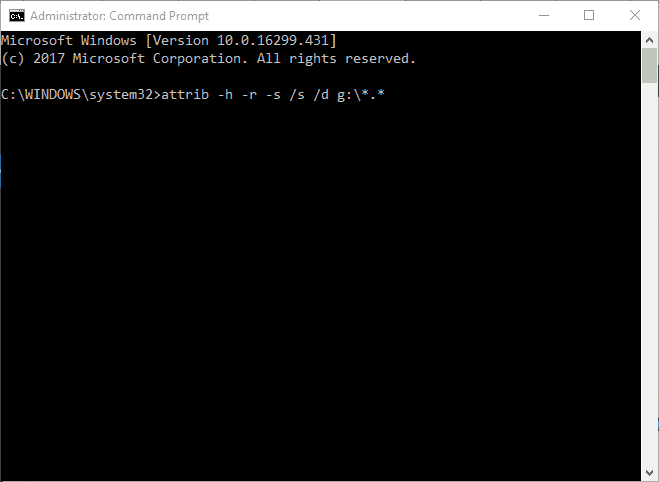
3. Show Missing Files in an Empty Folder From Command Prompt
A high-level way to see hidden files is using the command lines. See the steps below.
Step 1. Press Windows + R keys together and input cmd in the search box. Open the command prompt as an administrator.
Step 2. Make sure in which drive the folder shows empty, for example, drive G, then type the command attrib -h -r -s /s /d g:\*.* and press Enter. Refresh the folder and check if the files appear now.
Manual execution of the command line is suitable for computer professionals, since incorrect commands can do more harm than good. Therefore, for security and usability, we strongly recommend you try an automatic command line alternative — EaseUS CleanGenius. It is a practical tool that enables you to check and fix file system errors, enable/disable write protection and update your system with one-click instead of typing intricate command lines.
Follow the simple steps below to show hidden files with this 1-click-fix software.
Step 1. DOWNLOAD EaseUS CleanGenius for Free.
Step 2. Start EaseUS CleanGenius, choose «Optimization» on the left panel. Next, click «File Showing» on the right panel.
Step 3. Select the hard drive and click «Execute».
Step 4. After the operation completes, click the here link to check the hidden files.
Solution: How to recover files from a folder when Windows says it’s empty
In this part, we will show you two very common methods to resolve the «This folder is empty» error and that you could recover your hidden files as quickly as possible.
Solution 1. Restore files from «empty folder with FonePaw Data Recovery»
In many cases, the «This folder is empty» problem is caused by a virus. If you are not an expert in this field, you are advised to use third party data recovery software like FonePaw Data Recovery software (opens new window) as the problem, to be honest, is most likely beyond your control. personal reach.
To save your time and save your data as fast as possible, please download this software (opens new window) now.
A virus infected hard drive, memory card, USB flash drive … No matter where your data is hiding, FonePaw Data Recovery (opens new window) is able to remove your worries.
WARNING :
If you deleted or lost your folders on an external device, stop using it further. Simply connect it to your computer.
User Guide: FonePaw Data Recovery
After downloading the software (opens new window) , start it, then follow these steps:
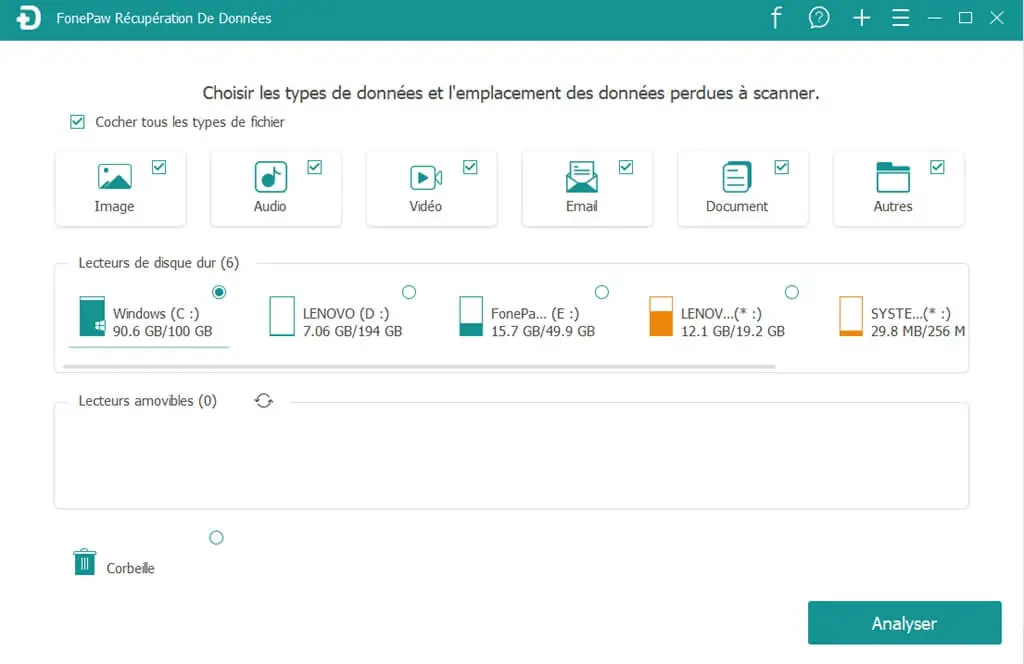
Step 1. Start searching for lost data
Select a hard drive or external device where you have lost a folder. Click on «Scanner» so that the tool can find the lost data.
Step 2. Preview the scan result
After the scan is complete, you can preview the files and folders found in the left list or use the search bar.
Tip: Double-click on the found files to preview them.
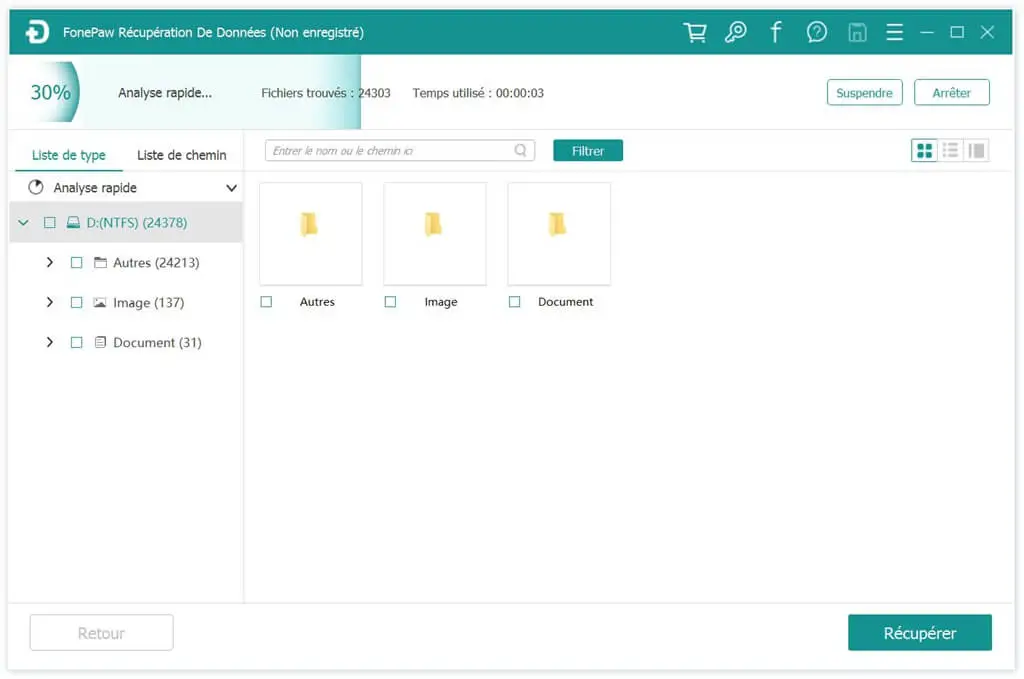
Step 3. Restore the desired data.
You can choose the files or folders you need and save them to a secure location with a single click on “Recover”.

Solution 2. Show hidden files in file explorer
To access your hidden data, try changing the settings in File Explorer. Specifically, you need to change the masking option there. Please follow our operations:
Step 1. In the search box on the taskbar, type “folder option” and then click “View”.
Step 2. Select “Show hidden files, folders and drives” under “Hide files and folders.” Then select “OK”.
Solution 3. Run attrib command to show hidden files
To view hidden and invisible items on Windows, you must first open File Explorer and then click on the “View” tab. Then check the option «Hidden elements».
In general, this option works well. If not, try «Command Prompt» instead.
Step 1. Click “Start”, and type “cmd” in the search box. Right click on “Command Prompt” and choose “Run as administrator”.
Step 2. Enter the following command: «attrib -h -r -s / s /dg:*.*», and press the «Enter» key. (Replace the «g» with the drive letter of your USB flash drive.)
Step 3. Close the Command Prompt window. Now check if the folder shows your files.